
Customer Responsibility
To complete the integration manually, the customer must follow the steps below in their SendGrid account. OptiKPI will not require account access.
1. Confirm SendGrid Account
Verify your email address when registering or accessing SendGrid. This step is mandatory for account activation.
2. Authenticate the Sending Domain
Authenticate the domain used for sending emails.
- Go to Settings > Sender Authentication > Domain Authentication
- Click “Get Started”, enter your domain and select your DNS provider.
- Add the generated CNAME records to your DNS.
3. Create a Verified Sender or Sender Identity
You must have at least one verified sender or identity in SendGrid.
- Navigate to Settings > Sender Authentication > Single Sender Verification
- Click “Create New Sender”, complete the form, and verify the email address.
4. Generate an API Key
Create a dedicated API key to enable the integration.
- Go to Settings > API Keys.
- Click “Create API Key”, assign a name, and grant appropriate permissions.
- Save the generated key securely.
5. Create an Unsubscribe Group
This allows customers to opt out from specific types of email campaigns.
- Navigate to Marketing > Unsubscribe Groups.
- Click “Create Unsubscribe Group”, give it a name and description, and click Save.
- Copy the Group ID for OptiKPI use.
6. Enable Event Webhooks
Configure event webhooks to allow OptiKPI to receive delivery and engagement feedback.
- Go to Settings > Mail Settings > Event Webhook.
- Enable the webhook, enter the webhook URL provided by OptiKPI, and select relevant events (e.g., delivered, bounce, open, unsubscribe).
- Save the configuration.

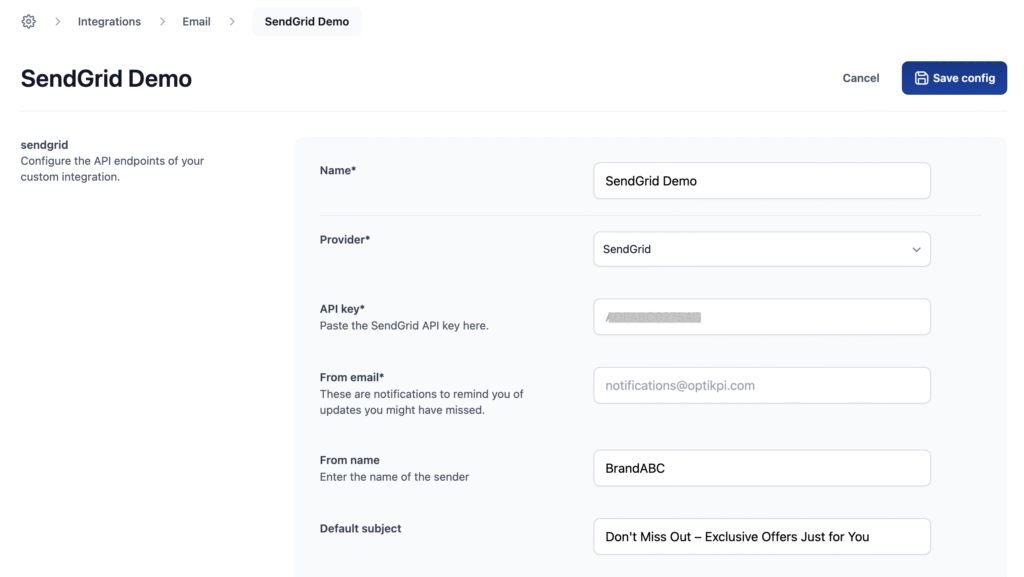
Required Configuration Details
These are the fields the customer must provide to complete the configuration in OptiKPI:
| Field | Description |
| API Key | API key generated in SendGrid |
| Unsubscribe Group ID | ID for the unsubscribe group created by the customer |
| Name | Name to display for this configuration in the OptiKPI UI |
| Subject | Default subject line for email campaigns |
| From Name | Name of the sender or brand (from the provider account) |
| From Email | Verified sender email address (from the provider account) |
OptiKPI Responsibility
Once the required information is provided, OptiKPI will carry out the following setup steps:
- Add SendGrid to the Integration Settings
SendGrid will be added as a configured email provider within the Integration Settings UI of your OptiKPI account.
- Complete the Email Configuration Fields
The OptiKPI team will input the required credentials and configuration data under the Email Configuration section, including:
- API Key
- Unsubscribe Group ID
- Sender Name
- Sender Email
- Default Subject
- Internal Configuration Name

- Enable and Verify the Configuration
After inputting the credentials, OptiKPI will register and activate the configuration to be used in campaigns and workflows. Internal tests may be conducted to confirm successful connection and delivery setup.
- Make Configuration Available for Use
Once activated, the SendGrid configuration will appear in the Integration List View, allowing users to select it for email content within campaigns and workflows. All email send-outs will use the linked unsubscribe group and webhook events for reporting.